
To install floating laminate flooring, start by preparing a clean, level subfloor and then lay down an underlay for cushioning and soundproofing. Begin installing planks in a corner, leaving a 1/4-inch expansion gap around the edges. Connect planks by angling the tongue into the groove, using a tapping block for a tight fit. Maintain the gaps, stagger joints, and add transition strips where needed. For detailed steps, keep exploring to guarantee a professional finish.
Key Takeaways
- Prepare the subfloor to be clean, dry, level, and free of imperfections before starting installation.
- Roll out and secure underlay across the entire area for cushioning and to smooth minor subfloor flaws.
- Begin laying planks in a corner, leaving a 1/4-inch expansion gap, and connect planks by angling tongue into groove.
- Install transition strips at doorways and ensure all planks are securely clicked and properly aligned.
- Remove debris, maintain expansion gaps, and finish by adding transition strips for a clean, professional look.
Installing floating laminate flooring is a straightforward process that can substantially enhance your space’s appearance. To get started, you’ll need to prepare the subfloor by ensuring it’s clean, dry, and level. Once the surface is ready, you can begin with underlay installation. Laying down the underlay is a vital step because it provides cushioning, reduces sound, and helps level minor imperfections in the subfloor. Roll out the underlay across the entire area, making sure to overlap the edges slightly, and secure it with tape if necessary. This creates a smooth, stable base for your laminate planks, improving overall durability and comfort.
Lay a smooth, secure underlay to create a durable, comfortable base for your floating laminate flooring.
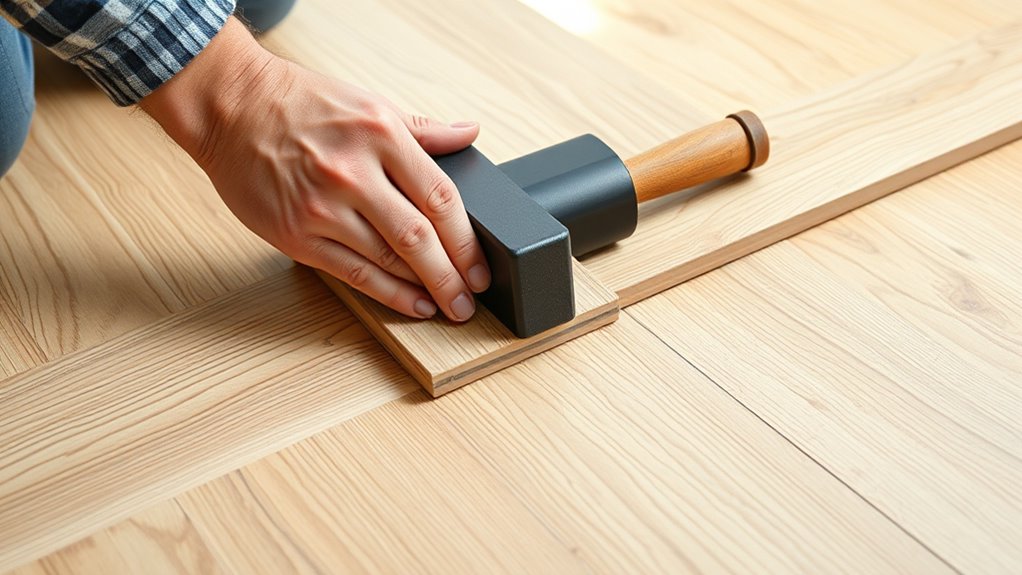
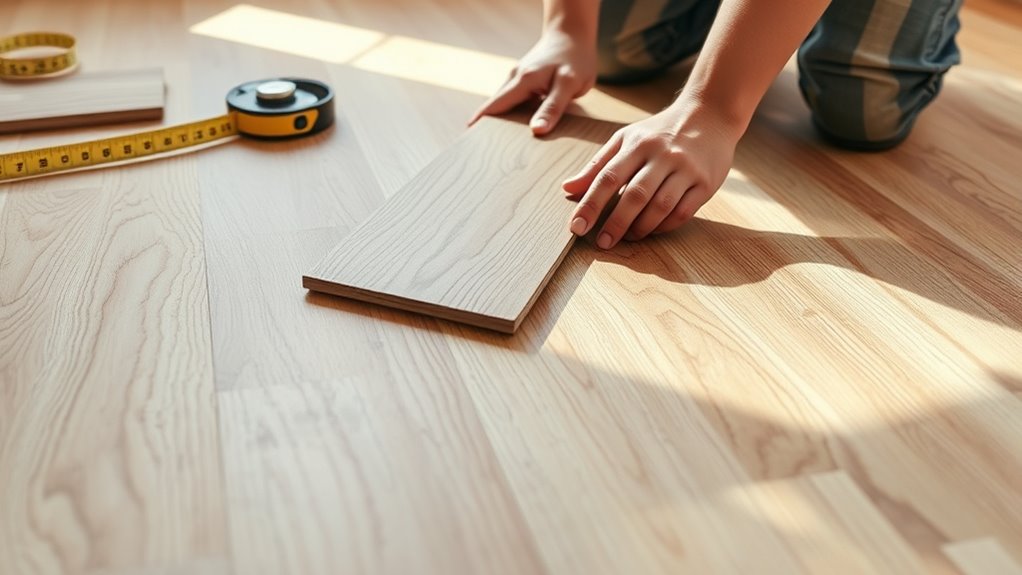
Next, you’ll start installing the laminate flooring planks. Begin in a corner of the room, leaving a small expansion gap—usually about 1/4 inch—between the wall and the planks. This gap allows for natural expansion and contraction of the flooring over time. Connect the planks by angling the tongue of one into the groove of the next, clicking them into place. Use a tapping block and a rubber mallet to ensure tight joints without damaging the edges. Continue this process across the room, working your way along the first row. If a plank is too long, measure and cut it with a saw, making sure to leave the expansion gap at the cut end as well.
As you move to the next rows, stagger the end joints of the planks by at least 12 inches to create a more natural look and increase stability. When you reach the edges of the room or around obstacles, measure and cut the last plank in each row to fit, maintaining the expansion gap. Once the entire flooring is laid, install transition strips along doorways and where the laminate meets other flooring types. Transition strips hide the expansion gaps and provide a clean, finished look, preventing tripping hazards.
A proper subfloor preparation ensures the longevity and stability of your laminate flooring, making the process smoother and more successful. Finally, inspect your work to guarantee all planks are securely clicked and aligned. Remove any debris or dust that accumulated during installation. You’ve now successfully installed floating laminate flooring. Remember, taking your time during underlay installation and properly placing transition strips guarantees a professional finish that will last for years. With a bit of patience and attention to detail, you’ll enjoy a beautiful, durable new floor that transforms your space effortlessly.

ROBERTS 70-115 Moisture Barricade Underlayment Film, for Vinyl, Laminate SPC, Engineered Wood Floors, 6 mil. Thick, Polyethylene, 120 Sq. Foot Roll, Black
For use as a vapor barrier when installing Vinyl, laminate, SPC and engineered wood flooring
As an affiliate, we earn on qualifying purchases.
As an affiliate, we earn on qualifying purchases.
Frequently Asked Questions
Can Floating Laminate Flooring Be Installed Over Carpet?
Floating laminate flooring isn’t typically recommended over carpet because of carpet compatibility issues. Installation over carpet can cause uneven surfaces and reduce the flooring’s stability and durability. If you’re considering this, make certain the carpet is thin, firmly attached, and well-secured. It’s usually better to remove the carpet first for a smooth, stable surface. This ensures your laminate flooring stays level and lasts longer, providing a professional finish.
How Do I Prevent Gaps Between Planks?
Oh, gaps between planks—what a charming feature! To prevent them, you need to respect expansion joints and leave proper expansion gaps, especially around walls and fixed objects. These gaps allow the flooring to breathe and expand without separating. Make sure your planks are tightly clicked and aligned during installation. Remember, ignoring expansion gaps turns your beautiful floor into a DIY puzzle with missing pieces!
What Tools Are Essential for Installation?
You’ll need essential tools like a tapping block and pull bar to guarantee your planks click lock securely. A saw helps you cut planks precisely, and a tape measure ensures accurate spacing. Don’t forget a moisture barrier to prevent water damage and spacers to maintain expansion gaps. These tools make installation smoother, helping you achieve a professional look while preventing gaps between planks and ensuring a tight fit with your click lock systems.
How Do I Handle Uneven Subfloors?
When dealing with uneven subfloors, you need to start with proper subfloor preparation. First, test for moisture to prevent future issues. If the subfloor is uneven, use a self-leveling compound or a floor patch to create a smooth surface. Sand down high spots and fill low areas. Ensuring a flat, dry, and stable subfloor helps your floating laminate flooring install correctly and last longer.
Is Underlayment Necessary for Floating Floors?
Ever wonder if you need underlayment for your floating floor? The answer’s a yes, with benefits you shouldn’t overlook. It provides cushioning, soundproofing, and moisture protection, making your floor more durable and comfortable. Installation considerations include choosing the right underlayment for your subfloor and flooring type. Skipping it might save time now, but the long-term comfort and performance of your floor depend on it. Don’t compromise—layer up for success.

NAACOO Laminate/Vinyl Flooring Tools, Tapping Block for Vinyl Plank Flooring – Double Sided with Notches, Pull Bar, 40Pcs Floor Spacers, Rubber Mallet. Universal Floor Installation kit.
【NAACOO UNIVERSAL FLOOR KIT】 4 IN 1 Portable KIT–Tapping Block has unique combination edge design for use with…
As an affiliate, we earn on qualifying purchases.
As an affiliate, we earn on qualifying purchases.
Conclusion
Now that you’ve installed your floating laminate flooring, you’ll have transformed your space faster than you can say “beautiful makeover.” Remember, patience and precise measurements are your best friends in this process. With your new floor in place, you’ll enjoy a stunning, durable surface that’s as impressive as a palace’s marble floors—without the royal price tag. So, walk confidently on your masterpiece and revel in the satisfaction of a job well done!

Art3d 4 FT Self Adhesive Vinyl Floor Transition Strip, Laminate Strip Flat Divider for Joining Gaps,Carpet Threshold Transition,Floor Tiles(1.57in, Brown)
Excellent Materials: High-Quality PVC Floor Transition Strips, which is scratch-resistant, abrasion-resistant, dirt-resistant. Easy to clean, just use a…
As an affiliate, we earn on qualifying purchases.
As an affiliate, we earn on qualifying purchases.

NAACOO Laminate/Vinyl Flooring Tools, Tapping Block for Vinyl Plank Flooring-Double Sided with Notches,10In Contour Gauge, Pull Bar, 40Pcs Floor Spacers,Rubber Mallet. Universal Floor Installation kit
🏆【NAACOO UNIVERSAL FLOOR KIT】 5 IN 1 Portable KIT–Tapping Block has unique combination edge design for use with…
As an affiliate, we earn on qualifying purchases.
As an affiliate, we earn on qualifying purchases.